Add an Interactive Map to Your Article in 60 Seconds
Learn how to add an interactive map to your blog post or article in under a minute — no coding, no manual pin-dropping, no design work required.
2026-02-24
Your article mentions a dozen locations. Your readers are opening Google Maps in another tab, trying to figure out where everything is. They're distracted. Some never come back.
You know the problem. You've written a detailed piece — maybe it covers a theater of war with place names most readers can't locate on a map, or a travel itinerary winding through towns they've never heard of. The geography matters to the story, but all you can offer is a static image with printed labels. Or worse, nothing at all.

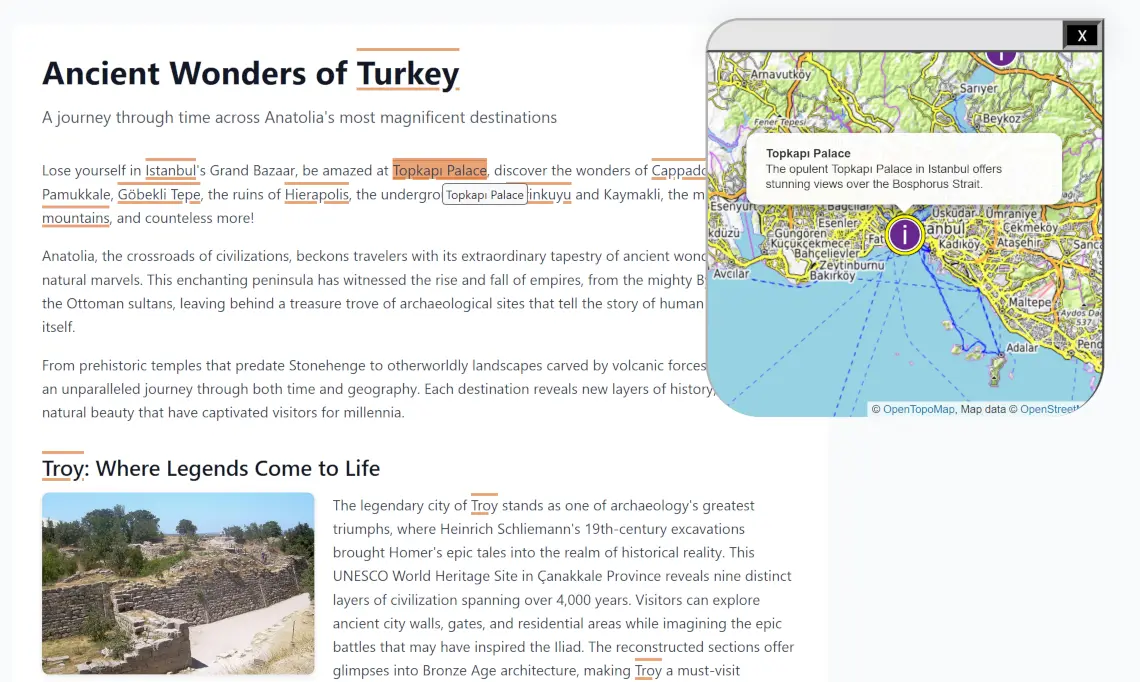
What if you could give them an interactive map — embedded right in your article — that highlights every place you mention? Where hovering over a name in the text jumps to the marker on the map, and clicking a marker scrolls to the relevant paragraph?
And what if it took less than a minute?
Here's how.
What You'll Get
In about 60 seconds of active work, you'll have:
- An interactive map showing every location mentioned in your article — automatically extracted, geocoded, and placed with high precision
- Two-way linking between text and map: hover over a place name in your article to see it highlighted on the map; click a marker on the map to jump to the relevant paragraph
- A single embed snippet you can paste into any blog platform — WordPress, Substack, Ghost, Medium, or plain HTML
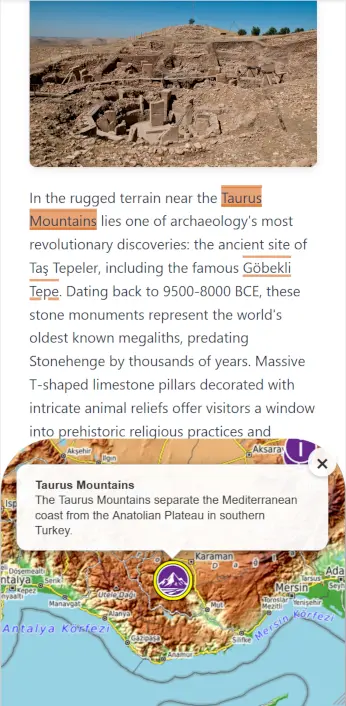
- Mobile-ready layout that adapts automatically — the map docks at the bottom on smaller screens but works exactly the same way
No coding. No manually dropping pins. No design work. No looking up coordinates.
Why Interactive Articles Win
Before we walk through the steps, let's talk about why this matters — because it's not just a nice-to-have.
Static articles with location-heavy content have a problem: readers wander off. They open a new tab to look up a place name. They get sidetracked. They forget where they were in your piece. Some don't come back at all. Every tab switch is a reader lost — and with them, the ad impressions and time-on-page your content depends on.
Interactive content fixes this by keeping the reader inside your article. The data backs it up:
- Higher engagement. When readers can explore a map without leaving the page, they spend more time with your content. They read more carefully because the geography makes sense in context, not in a separate window.
- Lower bounce rates. Fewer reasons to leave means fewer people leave. An embedded map answers the "where is that?" question instantly — no tab-switching, no breaking the reading flow.
- Competitive edge. Most publishers still use static images — or nothing. When your article has an interactive, text-linked map and your competitor's doesn't, readers notice. It signals quality, and they'll come back to the source that made the content easier to follow.
- Better comprehension. Spatial context isn't optional for location-heavy stories — it's essential. A reader following a conflict analysis across unfamiliar regions, or a food guide spanning neighborhoods they've never visited, needs a map to actually understand what they're reading.
The only reason publishers don't do this is that it used to be hard. It's not anymore.
Step 1: Register and Sign In
Head to geomapping.qcw.ai and click Start for free. Pick the free tier — no credit card required.
Enter your email and a password. You know the drill. Almost immediately you'll get a verification email. Click the link, and you're in.
Sign in, and Geomapping opens with a short tour. You can follow it or skip it — we're going to cover everything you need right here.
Step 2: Paste Your Article URL
This is the only thing you actually have to do: paste the URL of the article you want to map.
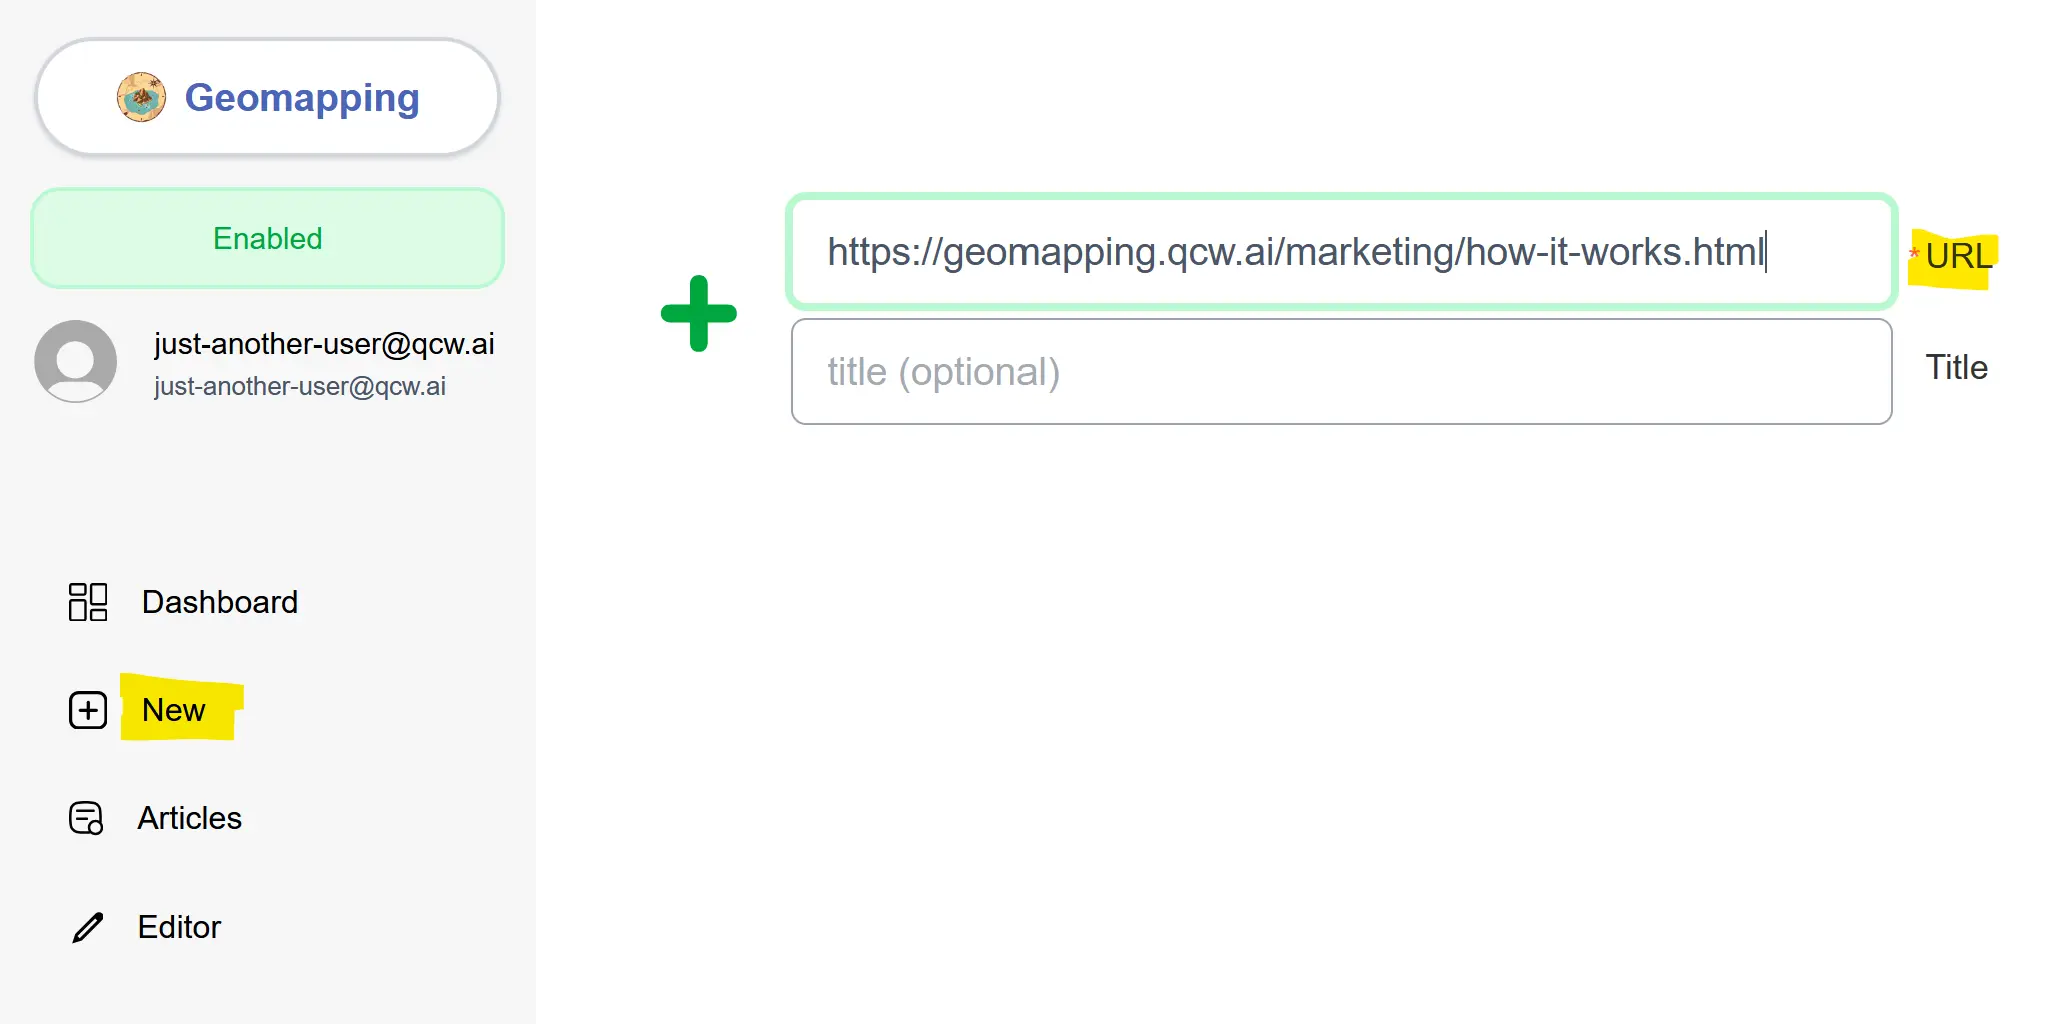
That's it. No uploading spreadsheets. No selecting a template. No filling in fields. Just the URL.
Geomapping fetches your article and gets to work. Behind the scenes, here's what's happening:
- Content extraction. The page is stripped down to the actual article text — sidebars, navigation, footers, headers, ad blocks, cookie banners — all removed. Only the flesh of the article stays.
- Entity recognition. Every location mentioned in the text is identified — cities, regions, landmarks, military positions, restaurants, neighborhoods, whatever your article talks about.
- Disambiguation and enrichment. This is where the precision comes in. Each entity is cross-referenced against Wikipedia and Google Places data. "Springfield" gets resolved to the right Springfield. Ambiguous references get disambiguated using the article's context. Coordinates are pinpointed with high accuracy.
- GeoJSON compilation. All of that enriched data — coordinates, descriptions, context — is compiled into a single structured file that powers the map.
You can watch this happen in real time. As the processing runs, Geomapping shows you the artifacts being created: the clean text, the extracted entities in progress, the enrichment data flowing in. It's satisfying to watch, but you don't need to do anything. Just wait.
Step 3: Adjust Your Map View
When processing finishes, you'll see your map — every extracted location placed as a marker, your article text alongside with place names highlighted.
Now, depending on your article, you might want to tighten the default view. If your article covers the Middle East but mentions a couple of global locations in passing, the initial map might be zoomed out too far. Geomapping gives you a rectangle overlay — the starting viewport of your map. Drag and resize it to frame the region that matters most. This keeps the embedded map focused and less noisy.
If a location was missed or misidentified, you can edit it manually — but most articles work accurately on the first pass, especially after the disambiguation and enrichment steps.
Once you're happy with the view, click Save and Publish.
Step 4: Customise the Map Appearance
Before publishing, switch to the Map Configuration tab in the editor. This is where you tailor the map's behaviour to your article type, your audience, and your site's monetisation strategy.
A few things you can control:
- Map visibility. By default the map is always visible, but you can set it to only appear when a reader clicks on a location in the text. This gives you a leaner page that still delivers the full interactive experience on demand — useful for content-dense articles where screen real estate is at a premium.
- Badge display. You can hide the Geomapping badge when the map is closed, keeping your page clean when the map isn't active.
- And more. Depending on your needs, the configuration tab offers additional options to fine-tune how the map integrates with your layout and reading flow.
These choices matter. A travel blog might want the map front and centre at all times. A news outlet running long-form analysis might prefer a click-to-reveal map that doesn't compete with the text. Geomapping lets you decide.

Step 5: Grab the Snippet and Embed
Go to the Preview tab in the editor: you'll find an HTML tag ready to copy.
Now here's the part that feels almost too easy: take that snippet and paste it into your article's HTML. That's it.
On your blog platform:
- WordPress: Add a Custom HTML block and paste the snippet
- Ghost: Use an HTML card and paste the snippet
- Substack: You may need to set up a custom Google tag to inject HTML into your post
- Any platform supporting HTML: Paste into your HTML or code view
The snippet activates your article text — place names become interactive, and the map appears. On desktop, it sits alongside the text. On mobile, it docks at the bottom of the screen. Same snippet, same functionality, responsive by default.
Publish your changes. You're done.
What Geomapping Actually Does to Your Content
It's worth pausing on what happens to your article after embedding, because this is where Geomapping differs from every other map tool.
Most map builders give you a map widget — a separate object embedded in your page. It sits there. Your text sits somewhere else. The reader has to mentally connect the two. It's better than nothing, but it's still a cognitive burden.
Geomapping doesn't just embed a map next to your text. It activates your text. Place names in your article become interactive elements. The map and the prose are woven together into a single reading experience. When a reader encounters an unfamiliar location, they don't need to stop reading and go search for it — the connection is already there, inline, immediate.
This is the difference between "an article with a map" and "an interactive article." One is two things on a page. The other is a unified experience.
Who Is This For?
If your content mentions places, it's for you. But it's especially useful for:
- News coverage. Articles covering regional events, politics, or natural disasters often reference dozens of locations unfamiliar to general audiences. An interactive map turns an impenetrable wall of place names into a navigable story.
- Conflict analysis. Pieces on geopolitics and military operations are especially dense with place names readers can't locate. A linked map lets them follow the analysis spatially, not just verbally.
- Travel writing. Itineraries, city guides, regional tours — readers want to see the route, the proximity of stops, the lay of the land. A linked map lets them plan as they read.
- Historical and longform journalism. Pieces that span geographies and time periods benefit enormously from spatial anchoring. Readers can follow troop movements, migration patterns, or investigative trails on the map as the narrative unfolds.
- Food and lifestyle. Restaurant roundups, bar crawls, neighborhood guides — these are inherently spatial content. A map isn't a bonus; it's what the reader actually needs.
Try It Now
Grab the URL of any article you've written that mentions multiple places. Paste it into Geomapping. See what you've been missing.
The free tier gives you everything you need to get started. No credit card. No time limit. No gotchas.
It's time for you to go out there and try Geomapping for yourself.